I had a special order for a football necklace shirt and made a test shirt for my daughter.
FSU colors are garnet (darker red) and gold so I went with gold thread.
When it came time to make the skirt, I didn't know what to do!
The two tier skirt wouldn't work because gold fabric is a no-go.
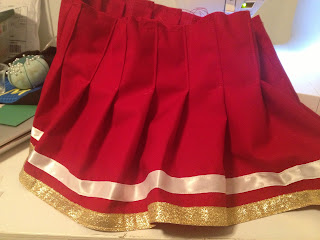
I decided on gold ribbon and to make a cheerleader type of skirt.
I had no idea how cute it would be!!!
First, I had to find a matching fabric. I got 24" (by 44") of the garnet color,
a spool of white ribbon, and a spool of gold ribbon.
I brought the shirt in with me to make sure it would match!
I layed out the ribbon in every configuration and finally decided on this.
For a 2T/3T, cut two 9"x length of fabric for the front and back of the skirt and a 3" band for the waist. You'll also need 17" of elastic. Once your fabric is cut, mark every 1.5" along
the top of the front. You'll match up every other line and pin in place.
After the entire front is pleated and pinned, you'll want to add the back layer of fabric to where it will join on the inside of a pleat. Undo the last pleat, sew your two fabrics together, and continue marking and pleating until you have 25" of pleated fabric. Then pin the bottom of the pleats in place to keep the pleats in place while sewing.
Mark 3" down on every pleat. This is the point you'll sew to.
Do a straight stitch down each pleat to your 3" mark.
Make sure to back stitch at the bottom so your stitch doesn't unravel.
Line up your waist band strip with the top of the skirt and sew in place.
It's fine for it to be a little longer than the skirt. You don't have to stitch it first.
Thread your 17" of elastic in to the band and pin the ends in place so they don't
get lost in the tube. Sew the skirt ends together to make your skirt.
I planned to sew ribbon along the bottom so I just hemmed up the bottom
edge on the outside of the skirt. The ribbon will hide that raw edge.
Now the skirt is done except for the ribbon.
I held the ribbon in place to make sure it lined up with the bottom egde perfectly.
With my sewing needle all the way to the right, I sewed the bottom of the gold in place.
When you get to the end of the ribbon, fold over the end and sew it down
so there are no raw edges.
Then sew the top edge of your bottom ribbon.
I set my white ribbon placement based on the gold ribbon.
With the needle all the way to the left, I made sure the edge of the sewing foot
was just above the gold ribbon.
Sew the bottom and top of that ribbon. Flip your skirt inside out and
iron the pleats down again, especially where the ribbons are.
The iron will burn ribbon if you touch the ribbon directly, so make sure
you do this on the inside of the skirt!
Before ironing:
After ironing:
I hope your little cheerleader loves the skirt you make!


How do i know how much i need for size 5t
ReplyDeleteI’m sorry, but I don’t know. The length would need to be a bit longer so you can measure a skirt you already own to check that. For the waist, you’ll need to have an extra 3” for it to easily slip on and off, so I would suggest making the pleats and continuing on until you get to her waist measurement plus 3”. Hope that helps!
DeleteThis comment has been removed by the author.
ReplyDeleteThis comment has been removed by the author.
ReplyDeleteHer waist is 19 inches so i guess ill do 19×3 so i will need 57 inches of fabric
ReplyDelete