Thursday, June 1, 2023

What does Cute Tutes offer?

 Hello and welcome!  

I am Jaci and I have loved dolls my entire life.  When my children started to play with 18" dolls, I bought pre-loved dolls to fix them up, customize them, and sew outfits for them as well.  I really enjoy the transformation process!   

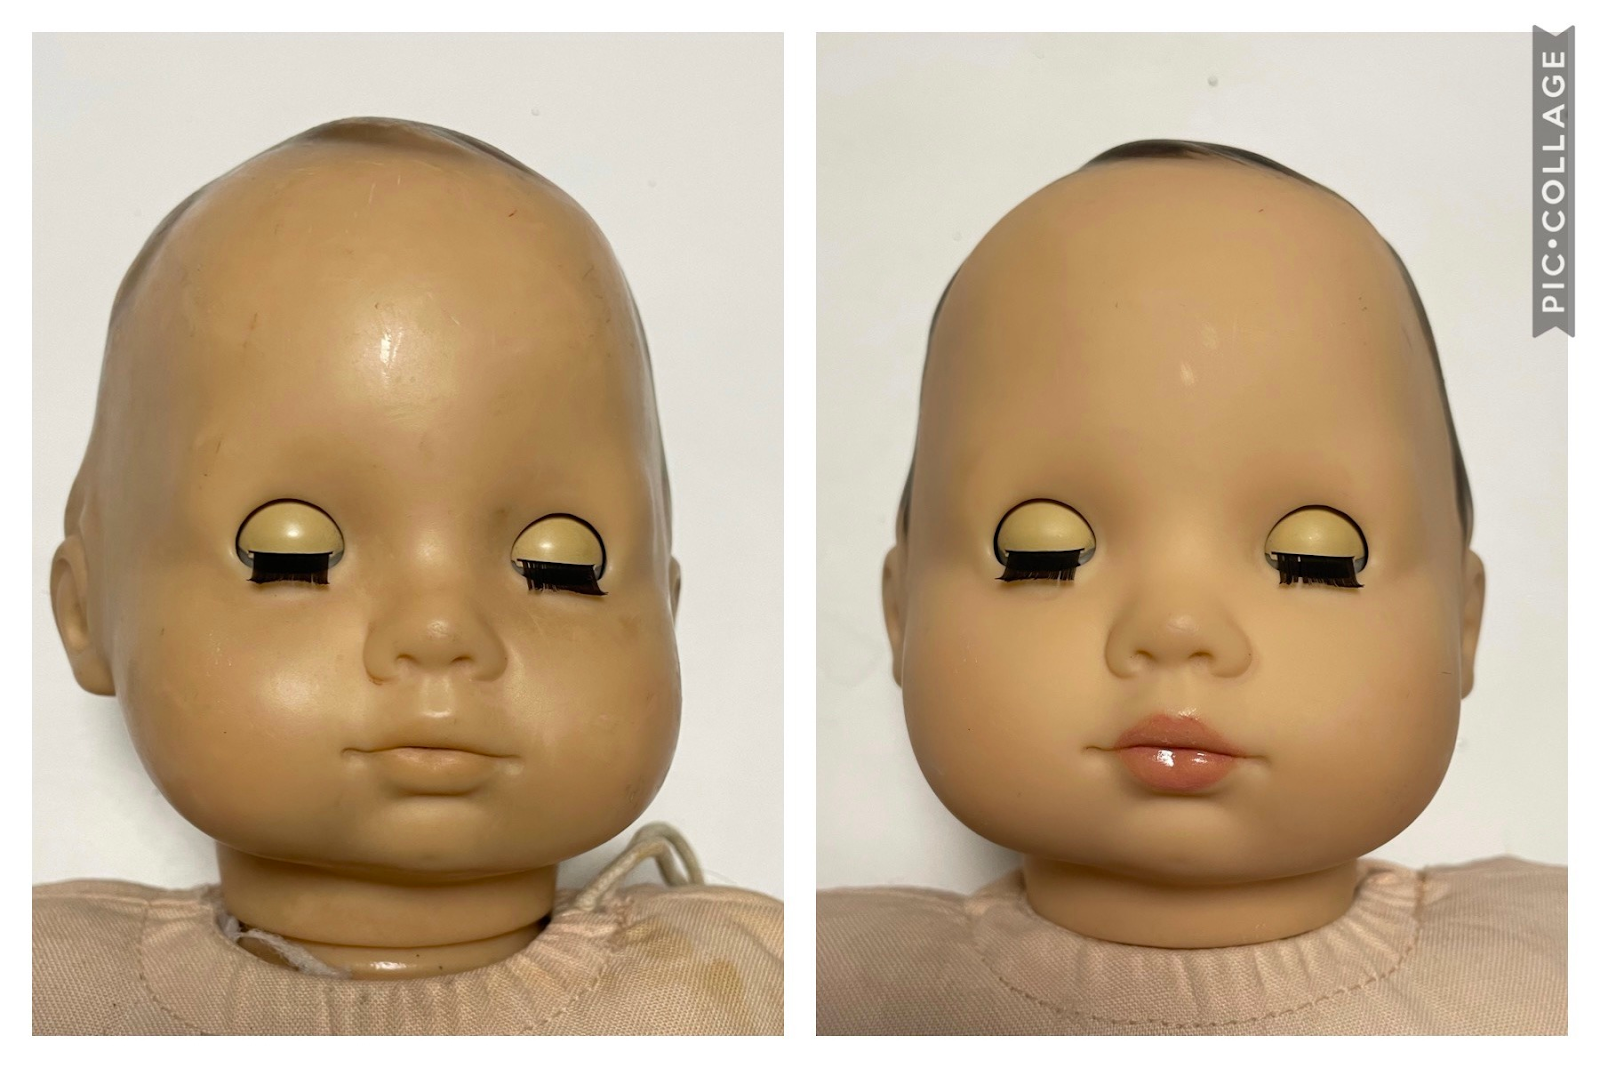
I can fix most doll issues - ink, damaged hair, loose limbs, paint rubs, squashed faces, stuck eyes, etc.  

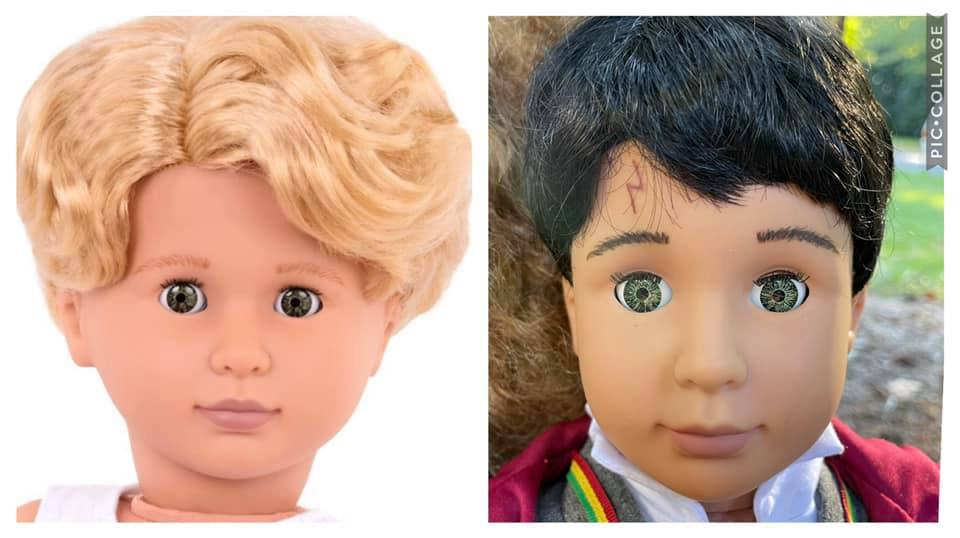
This Kirsten doll was left in an attic storage box with something resting on her face which caused it to be deformed.  I was able to get the original shape back, and she is a beauty!


The Bitty baby was in such bad shape, and now she's in a new home!  She was washed from head to toe, her hair was repainted, her stains were lightened or removed, and she was reblushed and given new lip paint as well. 
 

A friend of mine had these Barbies from the 60s and asked me if I could fix them up for her grandchildren to play with them.  As you can see, they turned out so nicely!  I was able to repair the cracked vinyl and remove the green tint from the top one.  Both dolls were given fresh face paint.

I can also customize a doll to look like your child or a well known character!  

Here are some of my custom dolls.  

This doll was purchased in the worst condition!  She was missing a leg, her body was covered in glitter and other marks, and her owner had given her dark red lipstick which stained her vinyl.  After fixing the staining, she was ready for paint and freckles (bottom left).  Then I decided to go a different direction with her and made her into the Scarlett Witch instead (bottom right)!  

This sweetie started as Tenney Grant and was turned into Taylor Swift!  I removed her freckles, replaced her brown eyes with blue eyes, curled her wig, and painted Taylor-style make up.  She is ready for the stage!  

My oldest daughter loves Harry Potter and these dolls are special customs for her own collection.
These are Our Generation dolls.  Hermione's hair was straightened as much as possible to get the fluffy Hemione hair from the first movie while the Harry Potter doll received a new wig.  Both dolls were given darker, thicker eyebrows and Hermione's lips were toned down to look more natural.  She was also given many faint freckles.  

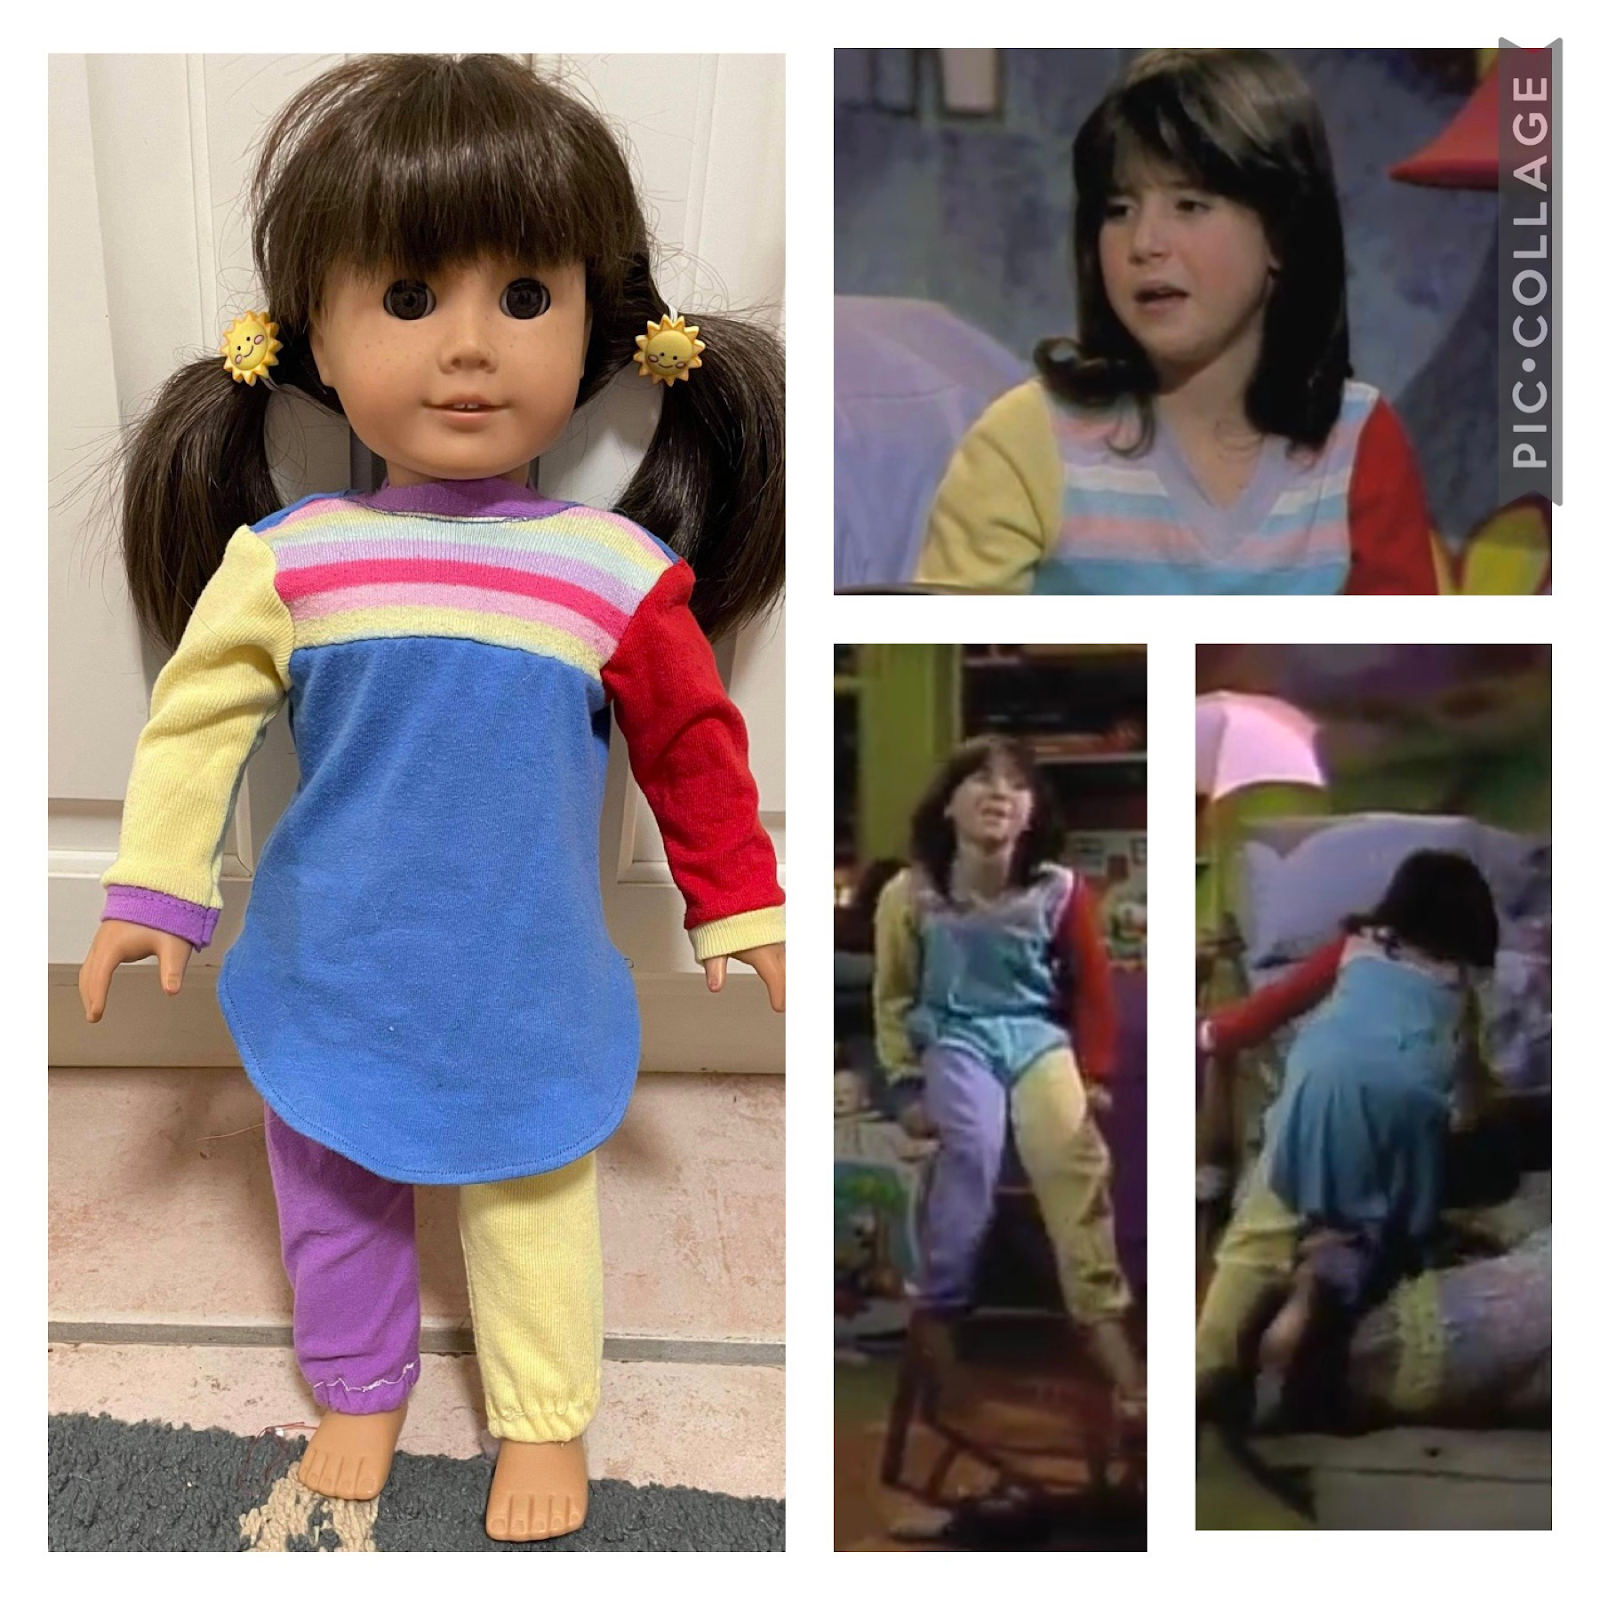
Punky Brewster was my FAVORITE character of all time when I was growing up!  I have created a few custom Punky dolls and enjoy making some of her iconic outfits. 

This doll was made to look like an older teenager and was given heavier makeup as well as gold eyeshadow!

To make this doll, I combined an American girl doll with a My Life As a Gymnast doll's legs and prosthetic foot.  
 

When American Girl released the 90s twins, all I could think about was Mary Kate and Ashley Olsen, so I made custom dolls of the most famous twins of the 90s!  The Our Generation face mold is so similar to their face shape and made the perfect base for them.

And finally, here is a custom I made to look like me as a child.  

I do not have set prices for my custom dolls as the pricing varies depending on many factors.  Repair costs vary depending on what the doll needs and how long it takes to fix the damages.

Feel free to contact me for your doll needs!

Wednesday, November 25, 2020

Our Generation doll turned into Hermione Granger

 My oldest daughter is a huge Harry Potter fan.  She's ALSO a huge American Girl doll fan.  We have been on the hunt for a doll we could turn into Hermione for quite a while, and just saw this sweet doll.  She is Mila by Our Generation.  She had the right face shape and the right color hair.  Based on this video, I thought we could straighten her hair *just enough* to make it look like Hermione's fluffy locks.  


The first thing we did was follow the steps in the hair straightening video.  This was the "before".  As you can see, her hair is VERY fluffy and curly.  


We washed it with Dawn then soaked it in fabric softener.  We dipped it in boiling water then brushed it and repeated dipping and brushing about 5 times.  The hair is still pretty curly on the ends, but is much more relaxed.  This photo is while her hair was still wet but had been towel dried.


I used acrylic paints to add her features.  I mixed brown paint with a bit of black to get Hermione's signature dark eyebrow color.  The above picture, one eyebrow has been painted.  I extended her brows in towards the middle a bit and past her eye a bit as well.  They aren't perfect but they look pretty good.


I used a skin tone color with a little bit of brown for her freckles.  I did a full layer of freckles with that color then added a tiny bit more brown to it to make a slightly darker shade.  I also added a layer of paint to her lips in a more natural tone.  It helps to add a bit of water to acrylic paint for things like lips so the paint will go on more smoothly and not leave paint lines.  

The final step was her bangs.  We were debating on whether to cut them or not and I left them a little long in case they curled up over time.  If they don't, I will trim them a little more.  


This is a close up comparison of her face painting before and after.  It's amazing to me what a big difference a small amount of paint makes!  


And finally, the side by side of the factory doll versus our "fixed up" Hermione.  My daughter is so happy with her!  <3

Sunday, February 2, 2020

Frozen II (2) birthday!

My sweet middle girl is turning 5 this week and we celebrated her birthday today.  She had a Frozen themed party when she turned 3 and wanted a Frozen 2 themed party for this birthday.  Here is my take!


This is the main table with all the food.  For the backdrop, I painted birch trees on a large piece of paper then cut them and used ticky tack to attach them to the wall.  I added leaves to be "Gale" and hung a "Believe" balloon from Party City.  For the table itself, I bought a Dollar Tree table cloth and traced outlines of Olaf, Anna, Elsa, Kristoff, and Sven walking through the Enchanted Forest.


The food included snowball (white popcorn), string cheese, Kristoff's Ice (blue jello), Sven's treats (carrots), cupcakes with leaves, and the Frozen 2 cake our girl wanted.  I knew I wanted the kids to be able to decorate cookies but snowflakes aren't really part of Frozen 2.  Then it dawned on me that we could decorate cookies like the elements!  I used a holly leaf cutter and then a knife to cut the holly leaves into diamonds.  This helped me make sure they were all the same size.  The cookies were a big hit.  The water was "melted snow".  I really lucked out when I went shopping for the water as the bottles were frozen 2 themed already!


I found this "paint your own rings" set at dollar tree.  The kids painted their rings as they came in and they dried while we were having the party.  


The birthday girl and her sister were dressed up like Elsa and Anna.  The "cloak" from the Elsa set can be removed and then the outfit turns into what she's wearing when she meets Water Nokk.  She LOVED that she could transform.


My children love the new characters so I wanted to incorporate Gale into the mix.  I had a vision for making this mobile and it turned out exactly as I planned!  The leaves are all hung at different lengths using fishing line.  It can twirl and the leaves all flutter.  It was just magical.  


Finally, we played Pin the Tail on Water Nokk.  I printed Water Nokk on some printer paper then traced him onto a poster board.  We used ticky tack to attach the tails and Elsa's belt to be the blindfold.  The kids thoroughly enjoyed this!  

Happy 5th birthday, baby girl!!!

Friday, October 4, 2019

Busy Book #2

After my first busy book, I was SURE I’d never make another.  It took me at least 3 months to make and was a major labor of love.  BUT then... my first busy book was either lost or stolen.  😢

A few months after realizing it was gone, I faced reality and realized my kids wouldn’t have a busy book again unless I made another.  So... I buckled down and did it.

The silver lining is there were so many new fresh ideas to try, so I was able to add a lot more fun things that weren’t included in our first busy book.  I decided this book would be a quick one, not nearly as time consuming as the first.  I’m happy to say it only took me 2 weeks!!! Part of that was experience (I made one before) and the other part is that I chose simpler pages.


The cover of this book is a bible cover with a zipper.  I embroidered it and included 3 butterflies, one for each of my girls.


This page is buttoning and color matching practice.  My girls love to pretend to paint faces, nails, etc, so I added a tiny paintbrush for them to use.


Mr. Potato head is so much fun!  The left page is a little suitcase to hold all the pieces.


The ballet shoes are for practice tying.  The unicorn is for playing with hair.  I'll be adding some bows and rubber bands so the girls can braid. 


And here we have our baking pages, haha!  The pie is weaving practice. 
The cupcakes have sprinkles for number recognition. They velcro on.  


I ADORE this sand castle page!  Each piece can be matched with any other.  The pail is for storage.


The dog is a white terrier, a family favorite!  The collar and leash are for buckling practice.
The girls love playing doctor so I added a doctor bag.  I placed these pages together so the girls could be veterinarians.  


The mouse maze and lacing page was very simple but is also fun.  The sequin page was the easiest one, but also the biggest hit!  I used a pillow from the dollar store and sewed it to stiffened felt. 


10... 9... 8... 7... 6... 5... 4... 3... 2... 1... Blast off!
It's a space shuttle!  This is a zipper practicing page.

I really hope this book stays with us until my girls are all grown 
and the grandkids can use it!