First, here is the cover. The cover is stiffened/stabilized felt. That helps it keep it's shape but still remains soft. I embroidered the cover, sewed the edges, and sealed it with handmade bias tape. The tab that buttons has stabilized felt on the inside and the outside is a fabric sleeve. The handle is stabilized felt too.
On the inside, there is a tag with our daughter's name and our contact information in case it is found by someone. Heaven forbid we ever lose all this work!!!
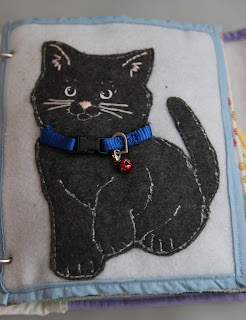
The first page is a cat with a collar that buckles and unbuckles. The red bell comes off as well but our daughter isn't able to do that yet. I made this page by pinning a coloring sheet to the fabric and sewing right over it. The pink in the ears, nose, and gray whiskers were done with DMC floss and the eyes were ironed on.
The pages are double sided. The back of the cat page is a caterpillar. The numbers velcro on and can be put in the pouch for storage.
The next page is flowers that attach to buttons. The object is matching the correct colors and the skill is buttoning and unbuttoning.
The apple tree was one of the most challenging pages of all! Each apple has a snap sewn to it and a matching apple glued to the top to hide the stitches. Each snap was sewn to the tree. The tree was attached with iron on fusible webbing. That stuff it magical for a book like this!
The converse shoe was a challenge but SO worth it! I mean, look how cute it is!!! I started with a picture of a converse and sewed the parts of the shoe together. I bought grommets and hammered them in place. The entire shoe can be laced, unlaced, and tied. The converse logo is ironed on.
Next was a simple page: weaving. I should have made the strips smaller and not quite to the edge.
The hair page is one of my favorites. I made a girl face and used fusible webbing to attach it. The little pouch serves as a holder for the accessories and also kind of look like a shirt. The hair is sewn in place under the bows but the long part hangs for our daughter to play with. She's not in to this page yet but she'll grow in to it!
The car page is my daughter's FAVORITE! I should have made the background green because it looks so drab to me, but oh well. The road is attached with fusible webbing and I hand stitched the lines with DMC floss. The garage provides storage for the car. All of the signs are ironed on.
The clothes line is so darling. The little clothes pins are from amazon. I just cut basic clothes out of felt. The clothes can be hung up or put in the laundry basket.
The camping page is for practicing zipping and unzipping. There's nothing too special about it but it's cute!
The mailbox page is my daughter's second favorite. There are letters in the mailbox written to her from her family. Again, I used iron-on paper and printed the letters family wrote to her. The "stamps" represent the writer's favorite thing.
Next to her mailbox is a writing tablet and a colored pencil.
The final page is a tic tac toe board. The pieces were buttons that I had as extras. I melted the button part off the back so they would be flat.
That's her book! I hope she's able to use it and enjoy for MANY years to come.


No comments:
Post a Comment