
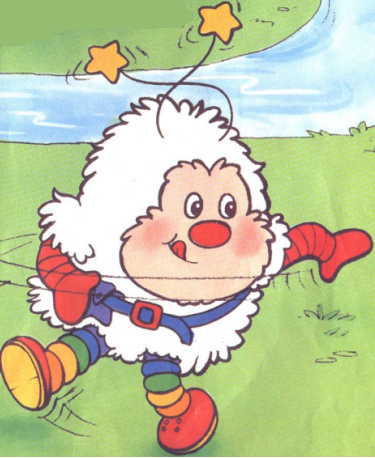
The Twink costume is almost done, so it's time to add the final touches. Today, I tackled the belt. I already owned a basic blue belt so that is my base. If you've ever searched for pictures of Rainbow Brite or other characters in the show, they are all different! At first glance, they all appear to be the same, but there are subtle differences in the colors and patterns.
Take Twink for example. In this picture, his belt is red with a yellow buckle and one blue pouch. In this one, his belt is blue with a red buckle and a purple star pouch. And in yet another (this picture), his belt is blue with an orange pouch AND a purple star. Since I own a blue belt, I decided to go with the last one.
Supplies needed:
- orange felt
- purple felt
- yellow felt (optional for small star on pouch)
- blue belt
- red felt
- stabilized felt (if that's what it's called. It's stiff)
- iron on/seam tape
I started with the orange pouch.
I didn't measure anything, but I had a basic size in mind.
Here is the shape I began with. It's looks like a banner.

I added the star because some pictures show the pouch with a star button.
Fold it to the size you want the pouch to be and crease it so you will know exactly
where to fold it when ironing it.

Place the belt where you want it to go. The iron on seam tape only goes up part of the way so the belt can be looped through. Remove the belt and iron the sides to fuse them.

Add a piece of seam tape to the tip of the pocket flap and the front to make the pouch.
It won't be usable, but it's just for show anyway. Iron that.

Your pouch is done. Now for the star pocket.
Start out with these two shapes; a star with one point missing and a house type shape.
The house part of mine wasn't long enough so I would suggest making yours a little longer.


Use seam tape to attach the two pieces together in this position.
After you iron it together, flip it over.

This is where I had to improvise a little. I used seam tape to attach another piece of felt to the back of the star. If you made your tab long enough, you won't need that piece.
This is the loop for the belt to go through.
The last thing I wanted to add was the belt buckle. Felt is pretty flimsy so I used some stiff felt and used seam tape to attach the red felt to the stabilized felt.

The buckle is about 2 inches by 2 inches. I rounded the corners and used an exacto knife to cut the slits for the belt to go through. They are about 1 cm from the edges of each end. That's it! Slide all three pieces on to the belt and you're done.

No comments:
Post a Comment