When I found out I was having a baby girl, I searched Pinterest for nursery ideas and saw this STUNNING hot air balloon mobile. Then I clicked the link and saw the price. I knew the only way I'd get one is if I made it myself. The woman who makes them is so incredibly talented and I love all of her mobiles. They're just perfect. Here is her shop.
I found some tutorials online that included templates (yay!) and decided to give it a go. The template didn't work so I had to alter it, but it was great to have a starting point.
Here is my template. The finished balloons are about 3" wide x 5.5" tall before adding the trim.
If you want larger balloons, you can enlarge the template.
Materials needed:
What do you have? I ask because I used practically everything in my craft room!
Fabric (8" by 24" is plenty for one balloon)
fabric/craft glue
hot glue gun
brown textured cardstock (baskets)
fleece (clouds)
jute/twine/string
bottle caps
Anything you want to embellish with
After you print and cut your template pieces, cut 8 shapes from your fabric for your balloon. I folded my fabric so I could cut 4 at a time. Because my fabric had lines, I made sure they were all perfectly lined up and pinned the fabric before cutting.
Take two pieces and pin them right sides together. Sew along one edge (I left about 1/4" seam allowance) and be sure to backstitch on both ends. Do not sew along the bottom.
After you have done all four pairs, pin and sew two together to make a panel of four. Again, right sides together. It's important to keep your stripes lined up if you have a striped fabric.
Now that you have two panels, join them together (right sides in) and pin.
I sewed all the others from top to bottom, but this piece, I sewed all the way around.
Be sure to backstitch the ends! Turn it right side out.
Now you're ready to stuff it! It's best to go slowly and use smaller pieces. My first few were understuffed. I think it's best to stuff them until you can't stuff anymore!
I grabbed a spool of thread and saw it was about the same circumference as my balloon opening, so I traced that on some stiffened felt. For the non-gray balloons, I glued fabric to the felt so it would match. Then I hand-sewed it to the bottom, tucking the raw edges in as I went. The first few, I sewed the raw edges in by hand then sewed the bottom on.
Now it's basically done! I cut a 1" x 4.25" strip of white felt and glued it to the bottom.
After this, I decorated the balloons. You don't HAVE to do that, and honestly, it took longer than making the darn balloons! But, I think it adds a lot. Just as a tip, place pins where you plan to put your embellishments. This will let you see if they're lined up before you stitch anything.
Ask me why this matters... ;) The trim around the felt is also glued on.
The baskets are tricky. My mother in law is actually crocheting baskets for me but I couldn't just leave this unfinished! Because it's temporary, I went with cheap and easy.
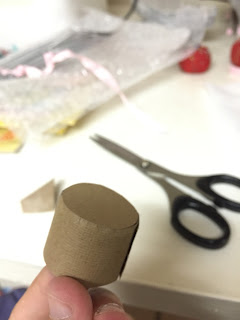
Basically, I took a bottle cap and hot glued a piece of textured cardstock to it. Then I hot glued a circle of it to the bottom and glued some 2.5" jute strings on the sides. Tie knots in your string before gluing it. The little square of paper on the inside allowed me to sandwich the jute string in the glue.
Starting with the shorter of the two strings (assuming yours aren't even either), sew it to the bottom of the felt. Hold the other string in place until the basket is level and sew it in place too.
Now we have baskets! Here are my finished balloons.
I didn't take pictures of the clouds being made, but they were incredibly easy. I made them with fleece. Cut out two pieces, pin them together, and sew 1/4" in from the edges. When you have only an inch or so left, keep it on the machine with the needle down and lift the presser foot. Now you can stuff the cloud without removing it from the machine! Once it's stuffed, finish stitching around.
This is the baby's view. I think I prefer it to the door view!
I'm no expert on how to make the mobile cross thing. I cut a 3/8" x 36" dowel in half and hot glued them in an X shape. Then I wrapped a ton of fishing line around the joint. I sewed fishing line into the top of each balloon, tied it off, and then tied the other end to the dowels. Total cost for this project was less than $8, but it took quite a bit of time.
I hope this tutorial helps you make a fabulous mobile for your room!


No comments:
Post a Comment